|
|
| Line 1: |
Line 1: |
| − | Notices are Insight messages. Some notices are generated automatically by Insight and others can be composed via the Notice Composer and sent to parents and students. <br> <br>
| + | ==The roles page== |
| | | | |
| − | =Notice Composer=
| + | The roles page will show a list of the roles that have been created. Each role is a set of permissions that decides what users are able to see and do in Insight. Users will be assigned to a role when a sync (the process for creating users) is performed. The roles page is used to create and manage the roles, rather than assign them to users. <br> <br> |
| | | | |
| − | ==Creating a Notice==
| + | [[Image:rolespage2.jpg]] <br> <br> |
| | | | |
| − | Notices can be created in Insight using the Notice Composer. The Role Option required to access this is: <br>
| + | Each role will be displayed with its name, description and a tick box showing whether users assigned to that role need a PIN number when logging in. <br> <br> |
| − | ''Manage > Notice Composer'' (On) <br> <br>
| |
| | | | |
| − | The Notice Composer is accessed via: <br>
| + | ==Types of Roles== |
| − | '''Manage > Notice Composer''' <br> <br>
| |
| | | | |
| − | Click '''Add''' to open a window where you can create a notice. Enter the '''Date''' for the notice. The date given to a notice does not affect the time that it is sent; notices, emails and SMS messages are always 'sent' immediately. The Notice will appear on the Notices page for students and parents under the selected date, but will be visible as soon as you save the Notice. <br> <br>
| + | There are five types of Roles within Insight: |
| | + | *Administrator |
| | + | *Student |
| | + | *Staff |
| | + | *Dynamic parental |
| | + | *Parental |
| | | | |
| − | The '''Expiry Date''' will cause the notice to disappear from users' inboxes on a certain date. Enter a '''Subject''' and a '''Body''' for the Notice. A list of mail merge fields can be found '''[[#Mail merge fields|below]]''', which can be used in the '''Body''' of the Notice. Use the '''Attachments''' tab at the top of the page to add attachments to the Notice. <br> <br>
| + | There could be multiple roles of each type i.e. a full access role for priority 1 parents and a limited access role for lower priority parents. Both of these roles would be Parental. <br> <br> |
| | | | |
| − | ==Selecting Recipients==
| + | Parental accounts will always be assigned to the Dynamic Parental role. Parent users will then have a second role that applies to them in conjunction with each pupil they are linked to, based on their relationship with that pupil. A parent who is the priority 1 contact for one pupil and a priority 2 contact for another pupil may be on two separate roles; one role to give full access to the pupil for whom they are the priority 1 contact and another role to give limited access for the other pupil. <br> <br> |
| | | | |
| − | Recipients for notices are selected using the '''Recipients''' tab. The '''Add''' button on the right of the page is used to select students. The notice will be sent to all Insight accounts linked to that student, which includes both parental accounts and the Insight account of the student. <br> <br>
| + | The rules that decide which role a parent is given for each pupil are set on the [[synchronisation rules]] page. <br> <br> |
| | | | |
| − | If the user has the following Role Option then they will always see a list of all academic classes when selecting recipients: <br>
| + | For administrators, staff and students, each user is assigned to one single role at any time. These users can be moved from one role to another via the [[users]] page however users can never be placed on a different type of role e.g. a staff account can never be assigned to an administrator role, but can be moved to a different staff role. <br> <br> |
| − | ''Manage > Notice Composer > Show All Subjects And Classes'' (On) <br> <br>
| |
| | | | |
| − | Otherwise the user will onlly see classes that they teach, when viewing academic classes. In this case there will be an option on the right of the page (before clicking the '''Add''' button) called '''Show All Classes''' which can be used to reveal all academic classes in the Recipients window. <br> <br>
| + | ==Creating and editing roles== |
| | | | |
| − | ==Email and SMS==
| + | The buttons on the top toolbar are used to create, edit, delete and clone roles. When creating or editing a role, a list of the menu items available in Insight will be displayed. <br> <br> |
| | | | |
| − | Notices sent using the notice composer can also be copied as emails and SMS messages. Insight requires some configuration before either of these types of messages can be sent. See the '''[[Communication setup]]''' page for further information about this. <br> <br>
| + | There are five miscellaneous settings at the top of the page: <br> |
| − | | + | {|class="wikitable" |
| − | When sending emails or SMS messages you have the ability to '''Defer until''' a later date. Insight will not send your message until this date and time in the future. You can also use the '''Hide notice''' option to send an email and/or SMS without an Insight notice. <br> <br>
| + | !Setting!!Effect |
| − | | |
| − | ===SMS===
| |
| − | | |
| − | A copy of the notice can be sent to parents' mobile telephone numbers using the '''SMS parents''' option when composing a notice. This option will only appear if the user has the following role option: <br>
| |
| − | ''Manage > Notice Composer > Allow SMS'' (On) <br> <br>
| |
| − | | |
| − | The '''Limit to one per address''' option will prevent more than one SMS message being sent to a household .e.g. if mum and dad live at the same address and both have Insight accounts, only one of them will receive the SMS message. The person that receives the SMS message is random. <br> <br>
| |
| − | | |
| − | ===Email===
| |
| − | | |
| − | Copies of notices can also be sent as emails to either students or to parents, using the '''Email Students''' and '''Email Parents''' options. There are no role options to disable these settings, however both can be enabled by default using the following Role Option: <br>
| |
| − | ''Manage > Notice Composer > Email by default'' (On) <br> <br>
| |
| − | | |
| − | By default, emails from the Notice Composer will be sent from the email address specified in this preference: <br>
| |
| − | ''Manage > Preferences > Email > Your Reply To email address'' <br>
| |
| − | The email address of the staff member that sent the notice can also be added (resulting in both email addresses receiving replies from students/parents) if the staff member has the following Role Option enabled: <br>
| |
| − | ''Manage > Notice Composer > Use Individual Reply Address'' <br> <br>
| |
| − | | |
| − | ===Private Response===
| |
| − | | |
| − | The '''Allow Private Response''' option adds a '''Reply''' button to the notice which students and parents can use. Replies are always sent via email. <br>
| |
| − | Replies will always be sent to the email address listed in this preference, if one has been added: <br>
| |
| − | ''Manage > Preferences > Email > Redirect all "contact" emails to this address'' <br>
| |
| − | Otherwise replies will be sent to the email address listed in this preference: <br>
| |
| − | ''Manage > Preferences > Email > Your Reply To email address'' <br>
| |
| − | {{Note|The '''Reply''' button will be hidden from parents if the '''Dynamic Parental''' role does not have the '''Contact staff''' option enabled.}}
| |
| − | <br>
| |
| − | | |
| − | ===BCC to Staff===
| |
| − | | |
| − | The notice can also be BCC'd to staff if required, using the '''CC Staff''' tab. Every staff member with an Insight account will be listed. A blind copy of the notice can be sent to each staff member by either email or SMS, providing their Insight account has an email address/mobile telephone number associated to it. <br> <br>
| |
| − | | |
| − | The user composing the notice will only be able to send BCCs via SMS if they have the following Role Option enabled: <br>
| |
| − | ''Manage > Notice Composer > Allow SMS'' (On) <br> <br>
| |
| − | | |
| − | ==Mail Merge Fields==
| |
| − | | |
| − | Mail merge fields can be used in notices sent from Insight. Simply type any of the merge fields below to pull data into your notices:
| |
| − | | |
| − | {| cellpadding="5" cellspacing="0" border="1" style="border:solid 1 #CCC; border-collapse:collapse" | |
| − | ! Mailmerge field !! Ouput | |
| − | |-
| |
| − | | {adno} || Admission Number
| |
| − | |-
| |
| − | | {onroll} || Whether the pupil is on roll or not
| |
| − | |-
| |
| − | | {name} || The pupil's fullname i.e. John Smith
| |
| − | |-
| |
| − | | {listname} || The pupil's surname followed by forename i.e. Smith, John
| |
| − | |-
| |
| − | | {gender} || The pupil's gender
| |
| − | |-
| |
| − | | {year} || The year group the pupil belongs to
| |
| − | |-
| |
| − | | {reg} || The registration group the pupil belongs to
| |
| − | |-
| |
| − | | {forename} || The pupil's legal forename
| |
| − | |-
| |
| − | | {chosenforename} || The pupil's chosen forename
| |
| − | |-
| |
| − | | {legalsurname} || The pupil's legal surname
| |
| − | |-
| |
| − | | {surname} || The pupil's chosen surname
| |
| − | |-
| |
| − | | {house} || The house the pupil belongs to
| |
| − | |-
| |
| − | | {dol} || The pupil's date of leaving
| |
| − | |-
| |
| − | | {heshe} || Either he or she, depending on the pupil's gender
| |
| | |- | | |- |
| − | | {himher} || Either him or her, depending on the pupil's gender | + | |style="text-align:center"|PIN||This enables two-factor authentication. When the user attempts to log in, a PIN will be emailed or sent via SMS to the user. They must then enter the PIN into Insight in order to log in |
| | |- | | |- |
| − | | {hishers} || Either his or hers, depending on the pupil's gender | + | |style="text-align:center"|Allow contacting of staff||This allows users to send emails to staff via the [[snapshot]], [[timetable]] and [[linked adults and agencies]] pages. Specific staff can be excluded from this via the [[do not contact]] page |
| | |- | | |- |
| − | | {hisher} || Either his or her, depending on the pupil's gender | + | |style="text-align:center"|Allow password change||This allows the user to change their password. This will not apply to SIMS passwords or Active Directory passwords |
| | |- | | |- |
| − | | {sondaughter} || Either son or daughter, depending on the pupil's gender | + | |style="text-align:center"|Do not prompt for generated password change||By default Insight will prompt users to change their password, if they still have a system-generated random password |
| | |- | | |- |
| − | | {himselfherself} || Either himself or herself, depending on the pupil's gender | + | |style="text-align:center"|Allow merging of accounts||This allows users to join their accounts together. This can be useful for households with more than one Insight account |
| − | |} <br>
| + | |} |
| − | | + | ''These options do not appear for Parental type roles. They can be found via the Dynamic Parental role type. <br> <br> |
| − | ==Editing and Deleting Notices==
| |
| − | | |
| − | Notices can be edited and deleted from the Notice Composer page. In both of these cases, the recipients will see the updated/deleted Notice, not the original Notice. This only applies to Notices within Insight; emails and SMS messages cannot be altered or deleted once they have been sent. <br> <br>
| |
| − | | |
| − | Users may be given access to each other's notices if required, using the following Role Option: <br>
| |
| − | ''Manage > Notice Composer > Show other users notices'' (On) <br> <br>
| |
| − | | |
| − | =Student and Parent View=
| |
| − | | |
| − | Students and Parents can access Notices via the Notices page. The Role Option required for this is: <br>
| |
| − | ''General > Notices'' (On) <br> <br>
| |
| − | | |
| − | The Notices page is found via: <br>
| |
| − | '''General > Notices''' <br> <br>
| |
| − | | |
| − | The notice page will show a list of the messages that have been sent to the user via the Insight Notice Composer. Some automatically generated notices may also appear here. One month's messages are shown at a time. The arrow buttons at the top of the page can be used to view previous or future month's messages. <br> <br>
| |
| − | | |
| − | Notices will be ordered chronologically, either earliest to latest or vice versa depending on the following preference: <br>
| |
| − | ''Manage > Preferences > Notices > Order Notices Newest First'' <br> <br>
| |
| − | | |
| − | It is also possible to display a Notices section on the '''[[Snapshot]]''' page, which has its own set of Role Options and settings. <br> <br>
| |
| − | | |
| − | ==Automatic Notices for Users==
| |
| − | | |
| − | Insight can produce many notices automatically for users, in various circumstance as described below. <br> <br>
| |
| − | | |
| − | ===Calendar Events===
| |
| − | | |
| − | Several SIMS calendar events can be displayed on the Notices page in Insight. You can select the events that you would like to display using the following preference: <br>
| |
| − | ''Manage > Preferences > Notices > Show These SIMS Events'' (On) <br> <br>
| |
| − | | |
| − | Each type of event that can be displayed will be listed. Turn the events on or off as required. <br> <br>
| |
| − | | |
| − | ===Messages from PARS===
| |
| − | | |
| − | Messages sent from the '''External Contact''' screen in <span class="plainlinks">'''[http://www.tascsoftware.co.uk/software-titles/pars-connect/ PARS]'''</span> can be displayed on the Notices page in Insight. Only the recipient of the message selected in PARS will be able to see the corresponding Notice in Insight. <br> <br>
| |
| − | | |
| − | This feature is enabled using the following preference: <br>
| |
| − | ''Manage > Preferences > PARS > Include PARS Communications In Notices'' (On) <br> <br>
| |
| − | | |
| − | ===Unexplained Absences===
| |
| − | | |
| − | A Notice will automatically be generated for unexplained absences (N codes) for students, if the following Role Option is enabled: <br>
| |
| − | ''Attendance > Report Absences'' (On) <br> <br>
| |
| − | | |
| − | The Notice will show a list of dates on which the student has N codes. The title of the Notice will always read "Unexplained Absences" but the body of the Notice can be edited. The body of the Notice will begin with the text from the following preference, followed by a list of dates on which the student has N codes for their attendance: <br>
| |
| − | ''Manage > Preferences > Notices > Notice To Use For Unexplained Absence'' <br> <br>
| |
| − | | |
| − | Users will be able to click on some or all of the dates to access the '''[[Report absences|Report Absences]]''' page for those dates if the following Role Option is enabled: <br>
| |
| − | ''Attendance > Report Absences > Allow reporting of historical absences'' (On) <br>
| |
| − | Dates which are upto this many days in the past will be clickable: <br>
| |
| − | ''Attendance > Report Absences > Maximum age of absence in days'' <br> <br>
| |
| − | | |
| − | The dates of recent attendance codes can be hidden using the following preferences: <br>
| |
| − | ''Manage > Preferences > Attendance > Hide marks in attendance summaries in the validation range'' (On) <br>
| |
| − | ''Manage > Preferences > Attendance > The number of days taken to validate attendance marks for attendance summaries (-1 for current week)'' (The number of days' attedance marks to be hidden) <br> <br>
| |
| − | | |
| − | ===Data Collection===
| |
| − | | |
| − | A notice will be shown prompting the user to view the '''[[Personal details]]''' page to check their details if the user is a parent and has the following role options: <br>
| |
| − | ''General > Personal Details'' (On) <br>
| |
| − | ''General > Personal Details > Allow new contact entry'' (On) <br> <br>
| |
| − | | |
| − | ===Linked Documents===
| |
| − | | |
| − | A student's Linked Documents can be displayed on the Insight Notices page. Linked Documents can only be displayed if they are set as '''Public''' in SIMS. Enable the following Role Option to display Linked Documents: <br>
| |
| − | ''Notices > Show Public Linked Documents'' (On) <br> <br>
| |
| − | | |
| − | In this case Insight will create one notice for each Public Linked Document for the student. Insight users can download the document. You can set a start date, meaning that Insight will not display any documents that were uploaded to SIMS before this date, using the following Role Option: <br>
| |
| − | ''Notices > Public linked documents earliest date'' <br> <br>
| |
| − | | |
| − | Linked Documents in SIMS have a '''Type''' field. Certain '''Types''' can be prevented from appearing in Insight by entering them into the following Role Option. If you want to hide multiple '''Types''', separate each with a + symbol <br>
| |
| − | ''Notices > Do not show the following document types'' <br> <br>
| |
| − | | |
| − | {{Note|If you want to show only specific '''Types''' of Public Linked Documents (as opposed to hiding some '''Types''') it is recommended to use the '''[[Subjects]]''' feature instead for Linked Documents.}}
| |
| − | <br> | |
| | | | |
| − | ===Medical Events===
| + | Beneath the miscellaneous options at the top of the page is a list of the menu items available to users of this role. Each menu item has an On Off button, which is used to show or hide the menu item to users. Some menu items have additional settings, accessed by clicking the Options button to their right. The [[list of role options]] page goes into detail about each individual option. <br> <br> |
| | | | |
| − | Medical Events can be recorded in SIMS, on the Student Details page. These events can be displayed on the Notices page in Insight if the following Role Option is enabled: <br>
| + | The menu items are divided into categories. The name of each category appears in bold and can be renamed by typing into the textbox next to it. <br> <br> |
| − | ''Notices > Show medical events'' (On) <br> <br>
| |
| | | | |
| − | ==Push Notifications==
| + | <div>[[Image:roles_categories1.jpg]]</div> <br> <br> |
| | | | |
| − | If students and/or parents use the Insight app then they will receive a push notification when they receive notices from the Notice Composer in Insight, or when they receive '''[[#messages from PARS|messages from PARS]]'''. The message used for push notifications is defined in the following preference: <br>
| + | Menu items can be reordered or moved into different categories by hovering the mouse over their icon, then dragging and dropping the menu items into the desired location. New categories can be created at the bottom of the page, where there will be an item for UDMenu1. This category will be empty (empty categories are not displayed to users), but the category can be renamed and have menu items moved into it. Multiple new categories can be created this way. <br> <br> |
| − | ''Manage > Preferences > Notices > Push message to use when new notices are created'' <br> <br>
| |
| | | | |
| − | In order for push notifications to be triggered for messages from PARS you will also need to create an '''[[API_keys#Settings_for_PARS_API|API Key for PARS to use]]'''. <br> <br>
| + | [[Category:Management]] |
The roles page
The roles page will show a list of the roles that have been created. Each role is a set of permissions that decides what users are able to see and do in Insight. Users will be assigned to a role when a sync (the process for creating users) is performed. The roles page is used to create and manage the roles, rather than assign them to users.
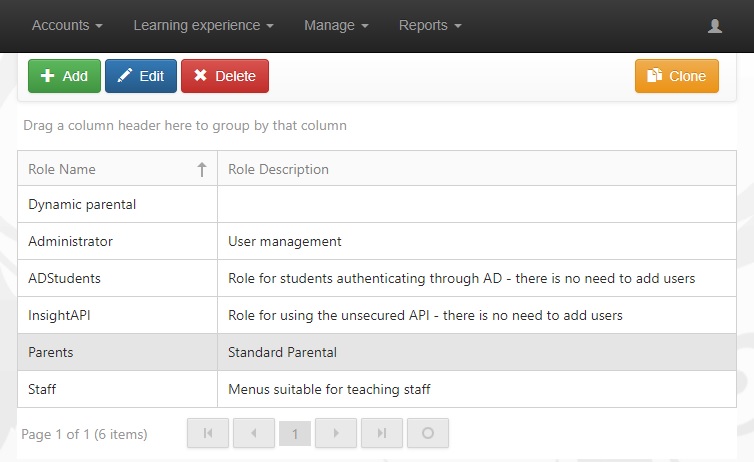
Each role will be displayed with its name, description and a tick box showing whether users assigned to that role need a PIN number when logging in.
Types of Roles
There are five types of Roles within Insight:
- Administrator
- Student
- Staff
- Dynamic parental
- Parental
There could be multiple roles of each type i.e. a full access role for priority 1 parents and a limited access role for lower priority parents. Both of these roles would be Parental.
Parental accounts will always be assigned to the Dynamic Parental role. Parent users will then have a second role that applies to them in conjunction with each pupil they are linked to, based on their relationship with that pupil. A parent who is the priority 1 contact for one pupil and a priority 2 contact for another pupil may be on two separate roles; one role to give full access to the pupil for whom they are the priority 1 contact and another role to give limited access for the other pupil.
The rules that decide which role a parent is given for each pupil are set on the synchronisation rules page.
For administrators, staff and students, each user is assigned to one single role at any time. These users can be moved from one role to another via the users page however users can never be placed on a different type of role e.g. a staff account can never be assigned to an administrator role, but can be moved to a different staff role.
Creating and editing roles
The buttons on the top toolbar are used to create, edit, delete and clone roles. When creating or editing a role, a list of the menu items available in Insight will be displayed.
There are five miscellaneous settings at the top of the page:
| Setting |
Effect
|
| PIN |
This enables two-factor authentication. When the user attempts to log in, a PIN will be emailed or sent via SMS to the user. They must then enter the PIN into Insight in order to log in
|
| Allow contacting of staff |
This allows users to send emails to staff via the snapshot, timetable and linked adults and agencies pages. Specific staff can be excluded from this via the do not contact page
|
| Allow password change |
This allows the user to change their password. This will not apply to SIMS passwords or Active Directory passwords
|
| Do not prompt for generated password change |
By default Insight will prompt users to change their password, if they still have a system-generated random password
|
| Allow merging of accounts |
This allows users to join their accounts together. This can be useful for households with more than one Insight account
|
These options do not appear for Parental type roles. They can be found via the Dynamic Parental role type.
Beneath the miscellaneous options at the top of the page is a list of the menu items available to users of this role. Each menu item has an On Off button, which is used to show or hide the menu item to users. Some menu items have additional settings, accessed by clicking the Options button to their right. The list of role options page goes into detail about each individual option.
The menu items are divided into categories. The name of each category appears in bold and can be renamed by typing into the textbox next to it.
Menu items can be reordered or moved into different categories by hovering the mouse over their icon, then dragging and dropping the menu items into the desired location. New categories can be created at the bottom of the page, where there will be an item for UDMenu1. This category will be empty (empty categories are not displayed to users), but the category can be renamed and have menu items moved into it. Multiple new categories can be created this way.

